Best Yoga Bolster Patterns to Buy in July 2026
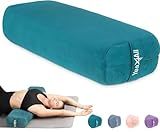
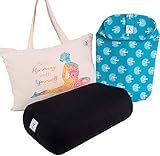
Gaiam Yoga Bolster - Long, Rectangular Meditation Pillow - Supportive Cushion for Restorative Yoga and Sitting on the Floor - Built-In Carrying Handle - Machine Washable Cover'
- SOFT, SUPPORTIVE CUSHION ENHANCES YOGA, MEDITATION, AND RELAXATION.
- ALL-NATURAL FILLING PROVIDES SUPERIOR COMFORT AND MAINTAINS SHAPE.
- CONVENIENT HANDLE STRAP ALLOWS EASY TRANSPORT AND REPOSITIONING.


MABOZOO Yoga Bolster Pillow, Rectangular Yoga Bolster for Restorative & Meditation, Professional Meditation Cushion with Carry Handle, 27"X10"X6"
-
PREMIUM COMFORT: MADE WITH DURABLE FOAM SPONGE & COTTON FOR LASTING SUPPORT.
-
EASY CARE: BREATHABLE CRYSTAL VELVET COVER IS REMOVABLE AND WASHABLE.
-
VERSATILE USE: IDEAL FOR YOGA, MEDITATION, PRENATAL SUPPORT, AND STRETCHING.
NGT new guide steps Yoga Bolster Pillow for Meditation and Support - Rectangular Yoga Cushion Foam Wedges Washable Suede Pillowcase for Men and Women with Carry Handles.(Green Soft fabric)
- DURABLE TRI-LAYER FOAM MAINTAINS FIRMNESS, WON’T DEFORM OVER TIME.
- ERGONOMIC DESIGN OFFERS OPTIMAL SUPPORT FOR DEEP STRETCHES & RELAXATION.
- ECO-FRIENDLY, SOFT CUSHION ENHANCES COMFORT WHILE ENSURING SUSTAINABILITY.
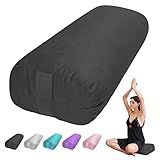
Yes4All Triple-Layer Sponge Yoga Bolster Pillow for Restorative Yoga & Meditation - Versatile Support Pillow, Balance & Poses Modification
- BOOST RELAXATION WITH MEMORY FOAM FOR ULTIMATE YOGA COMFORT.
- EASY CARE WITH A REMOVABLE COVER FOR QUICK CLEANING CONVENIENCE.
- PORTABLE DESIGN WITH A HANDLE FOR YOGA ON THE GO!
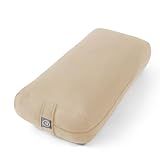
Meditation Cushion Yoga Bolster Pillow for Restorative Yoga- – Supportive Cushion for Meditation, Pilates, and Relaxation – Filled with 100% Cotton - Removable Faux Suede Cover, Beige
-
VERSATILE DESIGN: CHOOSE BETWEEN ROUND CUSHION OR RECTANGULAR BOLSTER!
-
CUSTOMIZE FIRMNESS: BUCKWHEAT FILL ADAPTS FOR PERFECT SPINE ALIGNMENT.
-
PORTABLE COMFORT: LIGHTWEIGHT FOR EASY TRAVEL; IDEAL FOR YOGIS EVERYWHERE!
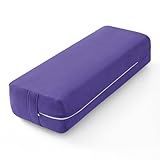
Wellsin Yoga Bolster Pillow for Restorative - Yoga Meditation Pillow with Washable Suede Cover, 27"X10" X5.5", Purple
-
STABLE SUPPORT WITH SOFT FOAM ENSURES COMFORT DURING YOGA SESSIONS.
-
EASY TO CLEAN: MACHINE-WASHABLE SUEDE COVER FOR LASTING FRESHNESS.
-
PORTABLE DESIGN WITH HANDLE & DUST BAG FOR EFFORTLESS TRANSPORT.
Manduka enlight Bolster Pillow - Yoga Pillow with Machine Washable Microfiber Cover, Curved Design for Optimal Workout and Meditation Support, Yoga and Pilates Equipment
-
ULTIMATE SUPPORT: ENHANCE YOGA & MEDITATION WITH ADDED COMFORT!
-
PREMIUM FABRIC: PLUSH, ABSORBENT MICROFIBER KEEPS YOU DRY & COZY.
-
ECO-FRIENDLY DESIGN: MADE FROM 30% RECYCLED MATERIALS FOR SUSTAINABILITY.
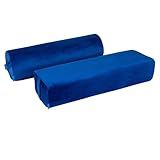
Gayo 100% Cotton Rectangle Yoga Bolster Pillow Set with Extra Cover and Carry Bag - Medium Travel Size Yoga Bolsters and Cushions - Supportive Yoga Accessories - Washable Cover- Black
-
ECO-FRIENDLY BOLSTER MADE OF 100% ORGANIC COTTON FOR COMFORT.
-
PERFECT SUPPORT FOR RESTORATIVE YOGA, INJURY RECOVERY, AND PREGNANCY.
-
BONUS REMOVABLE COVER INCLUDED; EASY TO WASH & STYLISH DESIGNS!
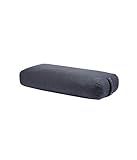
TokSay Yoga Bolster Pillow for Restorative & Yin Yoga - Meditation Pillow with Velvet Cover - Rectangular (Black)
- ERGONOMIC DESIGN ENSURES COMFORT FOR ALL YOGA POSES AND PRACTICES.
- ECO-FRIENDLY FILLER SUPPORTS THE PLANET WHILE ENHANCING YOUR FLOW.
- REMOVABLE COVER AND SLEEK HANDLE MAKE PORTABILITY EFFORTLESS!
SCFOAMZAI 2-Pack Yoga Bolster Pillow Set: Rectangular & Cylinder Pillows for Meditation and Support, Yoga Pillows with Washable Velvet Cover, Triple-Layer Sponge with Carry Handle, Blue
-
DURABLE FOAM TECHNOLOGY: RETAINS SHAPE AND FIRMNESS FOR LASTING COMFORT.
-
VERSATILE BOLSTER SET: PERFECT FOR YOGA, MEDITATION, AND EVERYDAY USE.
-
EASY TO TRANSPORT: BUILT-IN HANDLES FOR CONVENIENT, ON-THE-GO SUPPORT.
Making a yoga bolster pillow can be a fun project for those who enjoy sewing and crafting. A bolster pillow is a commonly used prop in yoga practice, providing support and comfort during various poses and stretches. Here is a step-by-step guide on how to make a yoga bolster pillow pattern:
- Materials: Gather the necessary materials, including fabric (preferably a sturdy cotton or blended fabric), thread, scissors, pins, measuring tape, a sewing machine, and stuffing material (such as polyester fiberfill or foam).
- Measurements: Determine the size of your bolster pillow. A typical yoga bolster is about 28 inches long and 10 inches in diameter, but you can adjust the measurements to your preference. Measure and mark the desired dimensions on your fabric.
- Cutting: Using the measurements as a guide, carefully cut two rectangular pieces from the fabric. These pieces will serve as the top and bottom of your pillow.
- Side Panel: Measure the circumference of your bolster by wrapping the measuring tape around one end and multiply it by 3.14 (Pi). This will give you the length of the side panel. Cut a long strip of fabric according to this measurement. Its width should be equal to the desired height of your bolster plus an additional allowance for seam allowance.
- Sewing the Side Panel: Fold the side panel strip in half lengthwise, with the right sides facing each other. Pin it along the length, forming a long tube. Sew along the pinned edge, leaving a small seam allowance.
- Attaching the Side Panel: Place one rectangular fabric piece (the top) on a flat surface with the right side facing up. Align one end of the side panel tube with the edges of the top piece. Pin the edges together, ensuring the side panel is evenly distributed. Continue pinning the side panel around the perimeter of the top piece until the two ends meet.
- Sewing the Side Panel: Using a sewing machine, stitch the pinned edges together all the way around the top piece, attaching the side panel. Remove any pins and press the seam flat.
- Bottom Piece: Take the second rectangular fabric piece (the bottom) and align it with the free ends of the side panel. Pin the edges together, ensuring the fabric is taut and evenly distributed.
- Sewing the Bottom Piece: Stitch the pinned edges together using the sewing machine, leaving a small opening of about 4-6 inches on one side. This opening will be used for adding the stuffing material.
- Stuffing: Gently turn the pillowcase right side out through the opening. Use your choice of stuffing material (polyester fiberfill or foam) to fill the pillow, ensuring it's evenly distributed and firm to your liking. You may also consider adding a zipper closure or buttons to easily remove and wash the cover.
- Closing the Opening: Once the pillow is fully stuffed, fold in the seam allowance of the opening and sew it closed using a hand needle and thread. Ensure the stitches are secure and hidden.
With these steps, you can make a yoga bolster pillow pattern from scratch. Personalize it by choosing fabric colors or patterns that reflect your style and enjoy the comfort and support it brings to your yoga practice.
Can I make a pattern for a round-shaped yoga bolster pillow?
Yes, you can definitely make a pattern for a round-shaped yoga bolster pillow. Here's a general outline of how you can create a pattern:
Materials needed:
- Fabric
- Sewing machine
- Scissors
- Pins
- Measuring tape
- Thread
- Zipper (optional)
Step 1: Determine the size and shape of your bolster pillow. Measure the length, width, and circumference of the round shape you desire. For example, let's say you want a bolster with a diameter of 12 inches and a length of 24 inches.
Step 2: Draw out the pattern on paper. To create a round shape, find the center point of your paper and measure out the desired radius (half of the diameter) from that point to mark the edges of your circle. Draw the circle by connecting those points smoothly.
Step 3: Add seam allowance. Measure and mark a line about ½ inch outside the circular shape. This will be your seam allowance, which allows room for sewing and stuffing.
Step 4: Cut out the pattern. Use scissors to cut along the outer line of the pattern, including the seam allowance.
Step 5: Use the pattern to cut out fabric pieces. Place the pattern on your fabric and pin it down. Trace around the pattern, adding seam allowance, and cut out the fabric pieces. Repeat this step to have two identical fabric circles.
Step 6: Sew the fabric pieces together. Place the fabric circles on top of each other, with the right sides facing inward. Pin them together to hold them in place. Starting at one side, use a straight stitch on your sewing machine to sew around the edge of the circle, leaving a small gap for stuffing.
Step 7: Turn the fabric right side out. Carefully pull the fabric through the gap you left unstitched. Gently push out the edges to get a clean round shape. You can press the fabric with an iron to make it even neater.
Step 8: Stuff the pillow. Start by inserting the stuffing material through the gap, using a pencil or chopstick to help push it into the corners evenly. Continue adding stuffing until you achieve your desired firmness.
Step 9: Close the gap. Using a needle and thread, carefully stitch the gap closed. Alternatively, you can attach a zipper to easily remove and wash the cover later on.
And now, you have created a round-shaped yoga bolster pillow! Adjust the measurements and details according to your preferences, and feel free to personalize the design or add extra features to make it unique for your needs.
How much does it cost to make a yoga bolster pillow?
The cost of making a yoga bolster pillow can vary depending on several factors such as the materials used, the size of the pillow, and the level of customization or embellishment desired. However, as a rough estimate, the cost of making a basic yoga bolster pillow typically ranges from $20 to $50. This includes the cost of fabric, stuffing material, thread, and any additional supplies required for construction. Keep in mind that these are approximate figures and could vary based on individual preferences and market prices.
Are there any eco-friendly options for making a yoga bolster pillow?
Yes, there are eco-friendly options for making a yoga bolster pillow. Here are a few ideas:
- Organic or natural fabrics: Look for fabrics made from organic cotton, hemp, or bamboo. These materials are sustainable, as they are grown and produced using fewer chemicals and water compared to conventional fabrics.
- Recycled materials: Consider using recycled fabrics or upcycling old materials to make your yoga bolster. Look for recycled polyester or fabrics made from recycled plastic bottles. These materials help reduce waste and resource consumption.
- Natural filling: Instead of synthetic fillers like foam or polyester fibers, opt for natural and more sustainable alternatives. You can use buckwheat hulls, which are the outer shells of buckwheat seeds. Buckwheat hulls are natural, biodegradable, and offer excellent support for a yoga bolster.
- Hemp or organic cotton thread: Choose thread made from eco-friendly materials like hemp or organic cotton. These options are more sustainable compared to conventional polyester or nylon threads.
- Non-toxic dyes: If you want to add color to your yoga bolster, consider using natural or plant-based dyes. These dyes are free from harmful chemicals and are more environmentally friendly.
Remember, eco-friendly options may vary depending on availability and personal preferences, so consider what works best for you and the resources available in your area.